18. STARTING SYSTEM GRAND DINK 250
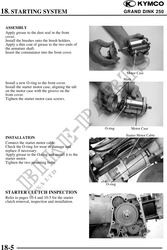
ASSEMBLY
Apply grease to the dust seal in the front
cover.
Install the brushes onto the brush holders.
Apply a thin coat of grease to the two ends of
the armature shaft.
Insert the commutator into the front cover.
Motor Case
Mark
Install a new O-ring to the front cover.
Install the starter motor case, aligning the tab
on the motor case with the groove on the
front cover.
Tighten the starter motor case screws.
O-ring Motor Case
Starter Motor Cable
INSTALLATION
Connect the starter motor cable.
Check the O-ring for wear or damage and
replace if necessary.
Apply grease to the O-ring and install it to the
starter motor.
Tighten the two mounting bolts.
O-ring
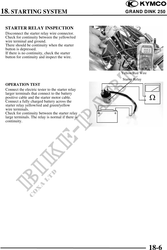
STARTER CLUTCH INSPECTION
Refer to pages 10-4 and 10-5 for the starter
clutch removal, inspection and installation.
18-5