8. DRIVE AND DRIVEN PULLEYS/
KICK STARTER GRAND DINK 250
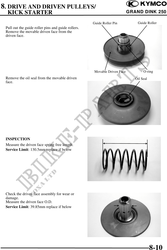
Check the clutch shoes for wear or damage.
Measure the clutch lining thickness.
Service Limit: 2.0mm replace if below
Clutch/Driven Pulley
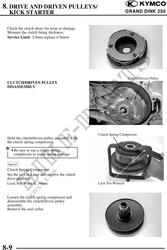
CLUTCH/DRIVEN PULLEY
DISASSEMBLY
Clutch Spring Compressor
Hold the clutch/driven pulley assembly with
the clutch spring compressor.
· Be sure to use a clutch spring
compressor to avoid spring damage.
Special
Clutch Spring Compressor
Set the tool in a vise and remove the clutch
drive plate nut.
Lock Nut Wrench, 39mm Lock Nut Wrench
Loosen the clutch spring compressor and
disassemble the clutch/driven pulley
assembly.
Remove the seal collar.
8-9