mxer mxu 150 Workshop-manual : Page 234

Microfiches
Image preview

Page 232

Image preview

Page 233

Image preview

Page 235

Image preview

Page 236

1 5 10 15 20 25 30 35 40 45 50 55 60 65 70 75 80 85 90 95 100 105 110 115 120 125 130 135 140 145 150 155 160 165 170 175 180 185 190 195 200 205 210 215 220 225 230 235 240 244
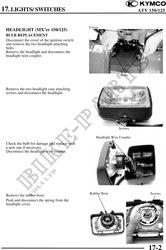
          17. LIGHTS/ SWITCHES                                                               ATV 150/125


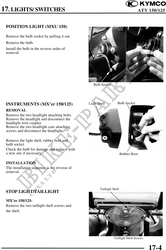
 POSITION LIGHT (MXU 150)

 Remove the bulb socket by pulling it out.
 Remove the bulb.
 Install the bulb in the reverse order of
 removal


                                                  Bulb Socket


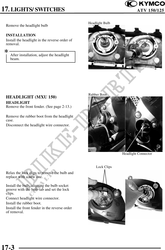
 INSTRUMENTS (MX'er 150/125)                   Light Shell          Bulb Socket

 REMOVAL
 Remove the two headlight attaching bolts.
 Remove the headlight and disconnect the
 headlight wire coupler.
 Remove the two headlight case attaching
 screws and disconnect the headlight.

 Remove the light shell, rubber boot and
 bulb socket.
 Check the bulb for damage and replace with
 a new one if necessary.                                                Rubber Boot

 INSTALLATION
 The installation sequence is the reverse of
 removal.


                                                      Taillight Shell
 STOP LIGHT/TAILLIGHT
 MX'er 150/125:
 Remove the two taillight shell screws and
 the shell.


                                                                 Taillight Shell Screws


                                                                                          17-4