United Kingdom

We work in partnership with many official Kymco dealers around the world.
You can select the country of your choice from the list below, whatever your choice, we can deliver worldwide!

mxu 400 Workshop-manual : Page 135

Microfiches
Enter the part number above
Image preview

Page 133

Image preview

Page 134

Image preview

Page 136

Image preview

Page 137

1 5 10 15 20 25 30 35 40 45 50 55 60 65 70 75 80 85 90 95 100 105 110 115 120 125 130 135 137
                                                                                      LCD Gauge

                                                              REPLACING

                                                              To replace the LCD gauge, use the following proce-
                                                              dure.
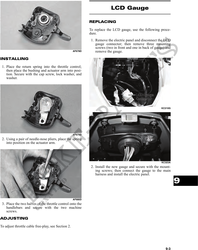
                                                               1. Remove the electric panel and disconnect the LCD
                                                                  gauge connector; then remove three mounting
                                                                  screws (two in front and one in back of gauge) and
                                                     AF678D       remove the gauge.

INSTALLING

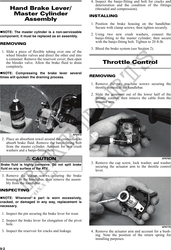
 1. Place the return spring into the throttle control;
    then place the bushing and actuator arm into posi-
    tion. Secure with the cap screw, lock washer, and
    washer.


                                                                                                             KC210G


                                                     AF679D
 2. Using a pair of needle-nose pliers, place the spring
    into position on the actuator arm.


                                                                                                             KC323A
                                                               2. Install the new gauge and secure with the mount-
                                                                  ing screws; then connect the gauge to the main
                                                                  harness and install the electric panel.

                                                                                                                       9

                                                     AF680D
 3. Place the two halves of the throttle control onto the
    handlebars and secure with the two machine
    screws.
ADJUSTING

To adjust throttle cable free-play, see Section 2.


                                                                                                                9-3