Choose your country
We work in partnership with many official Kymco dealers around the world.
You can select the country of your choice from the list below, whatever your choice, we can deliver worldwide!
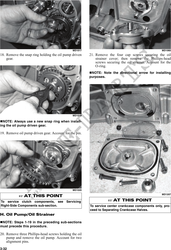
2. It is inadvisable to remove the screw securing the
pump halves. If the oil pump is damaged, it must
Servicing Right-Side be replaced.
Components NOTE: The oil pump is a non-serviceable compo-
nent and must be replaced as a complete assem-
bly.
NOTE: Whenever a part is worn excessively,
cracked, damaged in any way, or out of tolerance, DRIVEN PULLEY ASSEMBLY
replacement is necessary.
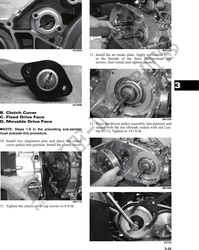
NOTE: The driven pulley assembly is a non-ser-
INSPECTING CENTRIFUGAL viceable component and must be replaced as a
CLUTCH SHOE complete assembly.
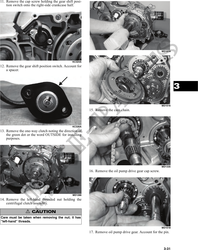
1. Inspect the clutch shoe for uneven wear, chips,
cracks, or discoloration.
Installing Right-Side
2. Inspect the depth of the grooves in the clutch
shoes. If any shoe is worn to the bottom of the
Components
groove, replace the complete set.
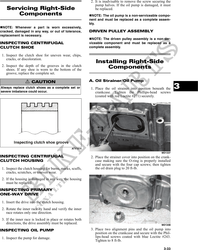
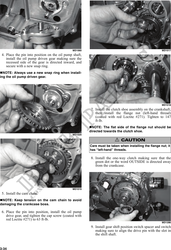
! CAUTION A. Oil Strainer/Oil Pump
Always replace clutch shoes as a complete set or 1. Place the oil strainer into position beneath the 3
severe imbalance could occur. crankcase. Tighten the Phillips-head screws
(coated with red Loctite #271) securely.
ATV1014
MD1337
INSPECTING CENTRIFUGAL 2. Place the strainer cover into position on the crank-
CLUTCH HOUSING case making sure the O-ring is properly installed
and secure with the four cap screws; then tighten
1. Inspect the clutch housing for burns, marks, scuffs, the oil drain plug to 20 ft-lb.
cracks, scratches, or uneven wear.
2. If the housing is damaged in any way, the housing
must be replaced.
INSPECTING PRIMARY
ONE-WAY DRIVE
1. Insert the drive into the clutch housing.
2. Rotate the inner race by hand and verify the inner
race rotates only one direction.
3. If the inner race is locked in place or rotates both
directions, the drive assembly must be replaced. MD1208
INSPECTING OIL PUMP 3. Place two alignment pins and the oil pump into
position on the crankcase and secure with the Phil-
1. Inspect the pump for damage. lips-head screws coated with blue Loctite #243.
Tighten to 8 ft-lb.
3-33